Recipe: Apple Crumble with Almond Paste and Granola

Recipe: Apple Crumble with Almond Paste and Granola

Apple crumble is one of those cozy desserts that I just can’t get enough of, especially during winter and fall, when it’s cold outside. My recipe has almond paste, which tastes delicious together with the apples. In Denmark, I would use Danish marzipan (best marzipan in the world, if you ask me), but in the US I’ve found that marzipan is much too sweet and have too little almonds, so almond paste is a better bet.

The addition of granola brings extra texture and flavor, and I put it under the crumble topping so it doesn’t get burned. I’m using Tina’s Hungry Bird Eats granola with Cardamom and Cinnamon, which is perfect for this recipe, but you can use other kinds of granola too. Though I would recommend granola without chocolate and dried fruits.

Regarding apples, I would usually go for tart green apples, but when Tina and I made the video for this recipe, we only had red apples on hand. Turns out, they worked out nicely too.

Recipe: Apple Crumble with Almond Paste and Granola

Recipe by 2 Hungry Birds Course: Dessert
Servings

8

servings

Apple crumble is one of those cozy desserts that I just can’t get enough of, especially during winter and fall, when it’s cold outside. My recipe has almond paste, which tastes delicious together with the apples, and granola, which brings extra texture and flavor.

Ingredients

  • Crumble
  • 1 ⅔ cups 1 ⅔ (200g) all-purpose flour

  • ¾ cup ¾ (150 g) sugar

  • 1 ⅓ sticks 1 ⅓ (10 tbsp, ⅔ cup, 150g) unsalted butter, cold and cubed

  • Pinch of salt

  • Filling
  • 4-5 4-5 apples

  • 2 tablespoons 2 sugar

  • 1 teaspoon 1 ground cinnamon

  • 4 oz 4 almond paste

  • ½ cup ½ Cardamom + Cinnamon Granola

Directions

  • Prepare the crumble topping
  • Place the cold butter cubes in a mixing bowl. Add flour, sugar, and salt.
  • Rub the butter into the dry ingredients using your fingertips until the mixture resembles coarse breadcrumbs. Set aside.
  • Prepare the apples
  • Peel the apples and cut into cubes.
  • Toss the apple cubes with the sugar and cinnamon until evenly coated.
  • Assemble the Layers
  • Arrange the apples in an even layer in a baking dish.
  • Scatter chunks of almond paste evenly over the apples.
  • Sprinkle granola over the almond paste.
  • Finally, spread the crumble mixture evenly over the granola layer.
  • Place the assembled crumble in the preheated oven and bake at 375°F (190°C) for about 45 minutes, or until the topping is golden brown and the apples are tender.
  • Serve while still warm. The apple crumble tastes delicious with a scoop of vanilla ice cream or a dollop of sour cream, Greek yogurt, or whipped cream.

Recipe Video

Recipe: Mini Tarts with puff pastry, fresh tomatoes and arugula pesto

Recipe: Fresh Tomato Tart

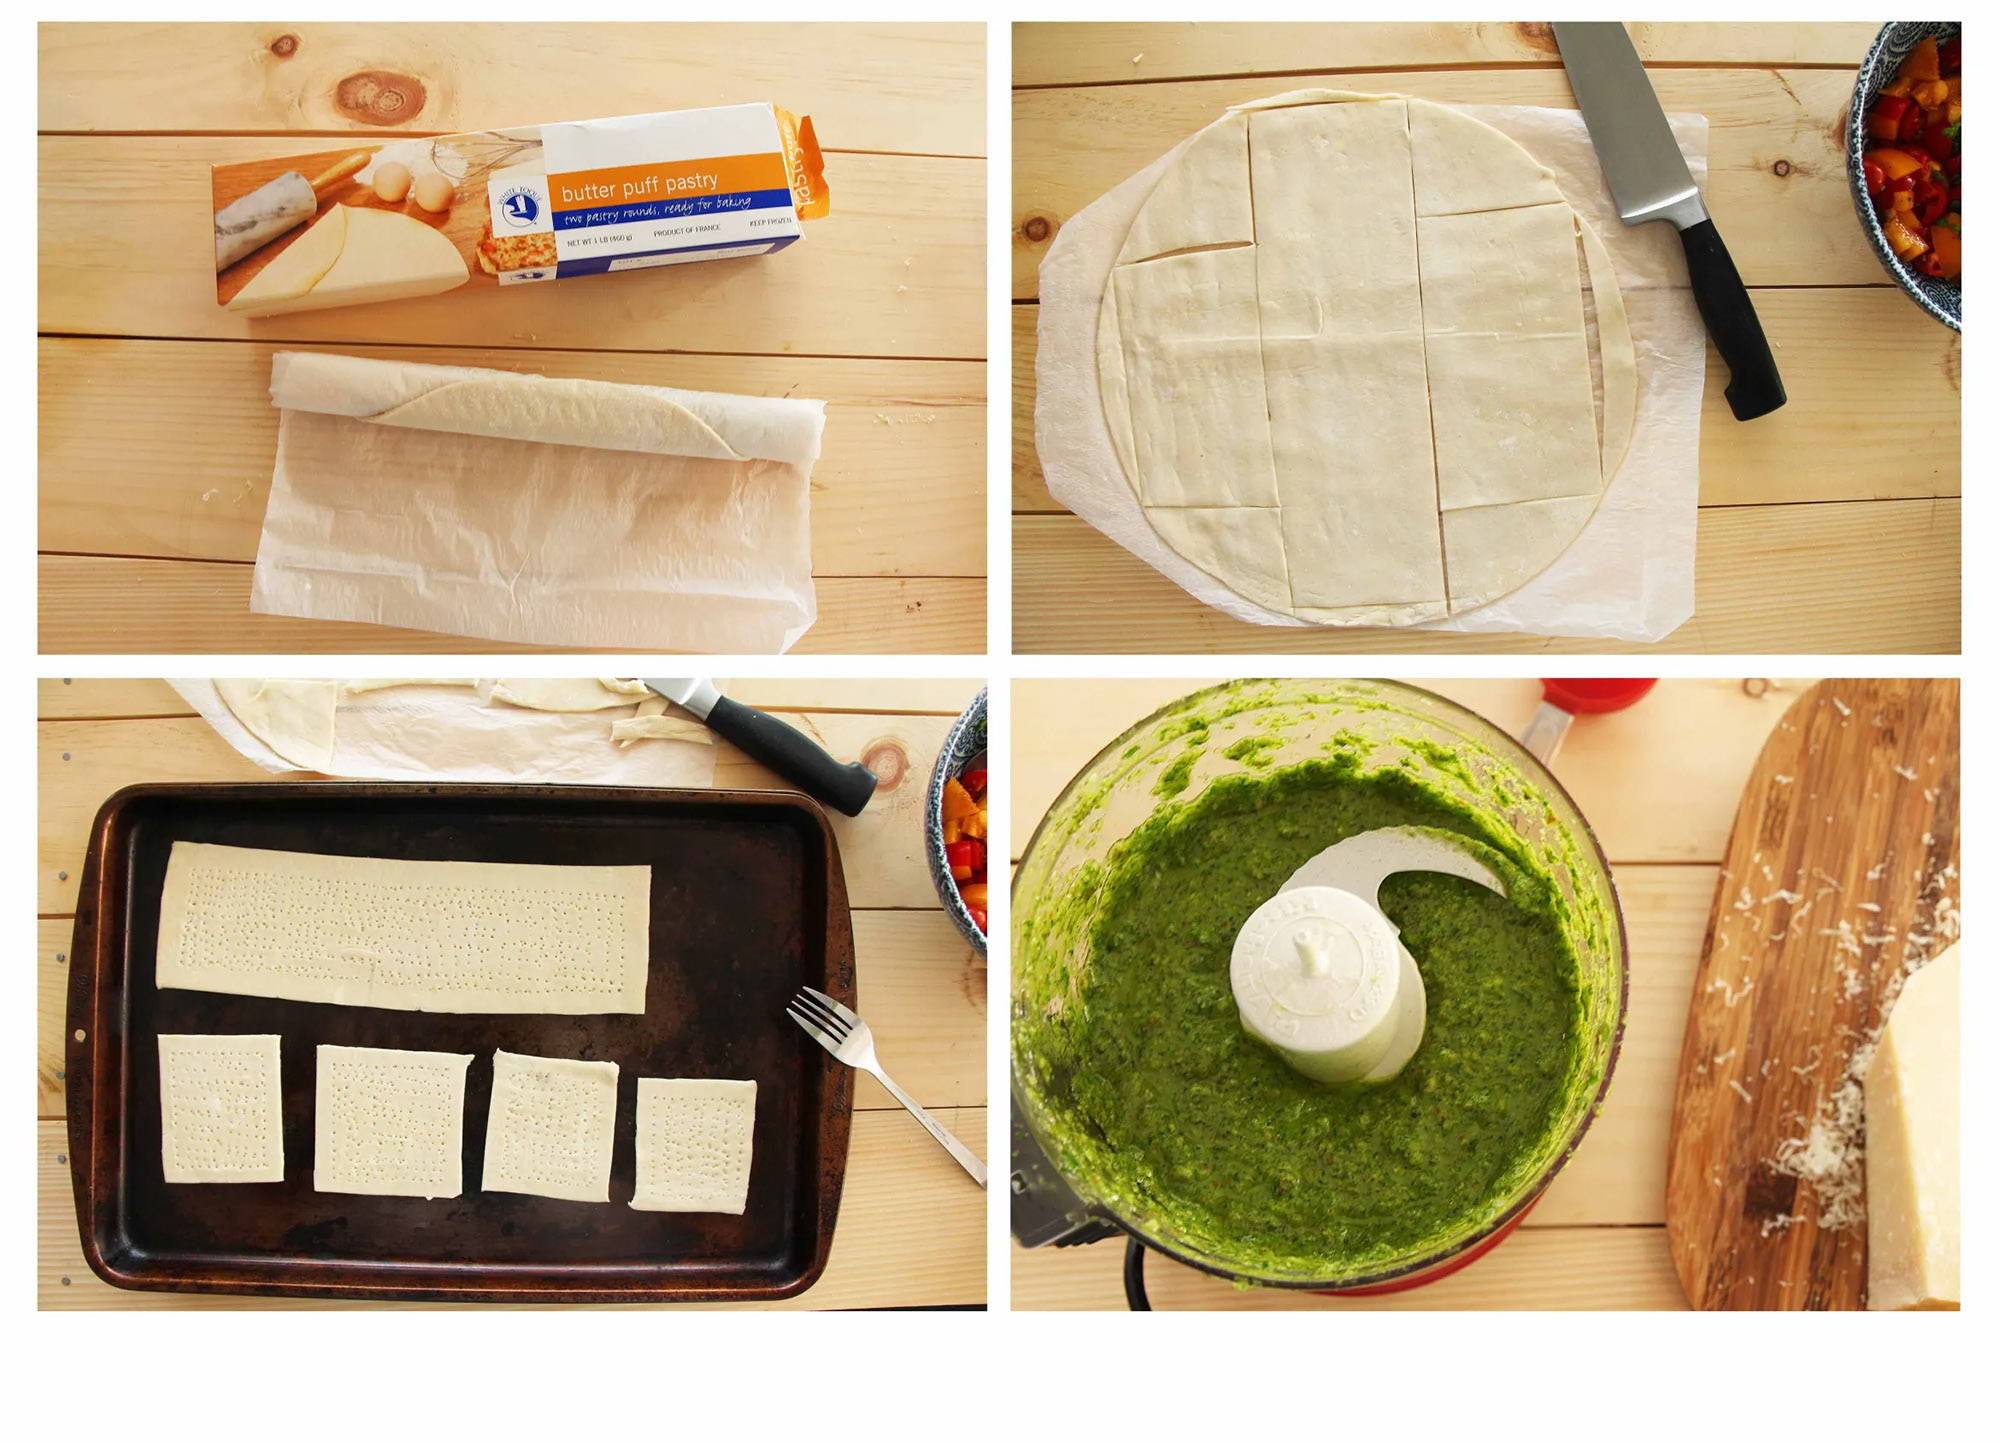
Tina: Puff pastry is such an amazing thing! Honestly, I’d never try making it myself because it takes a lot of time. It’s basically made of loads of dough and butter, and you have to do it at just the right temperature. But luckily, you don’t have to go through all that trouble – you can grab some puff pastry from the freezer section (look for the ones with natural ingredients if you can), and it’s pretty easy to work with.

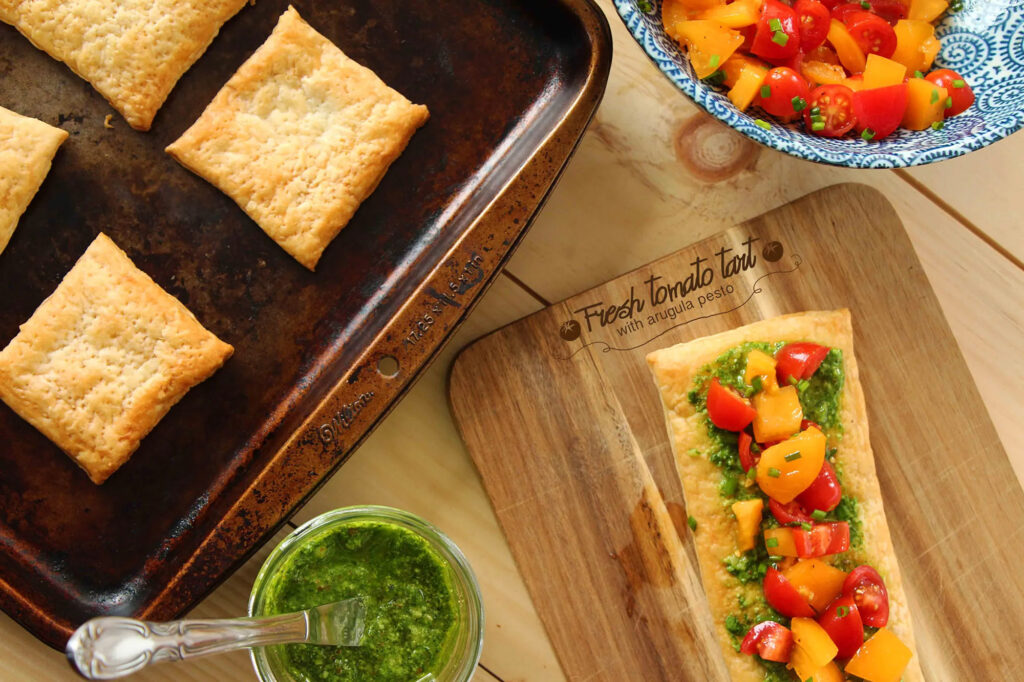
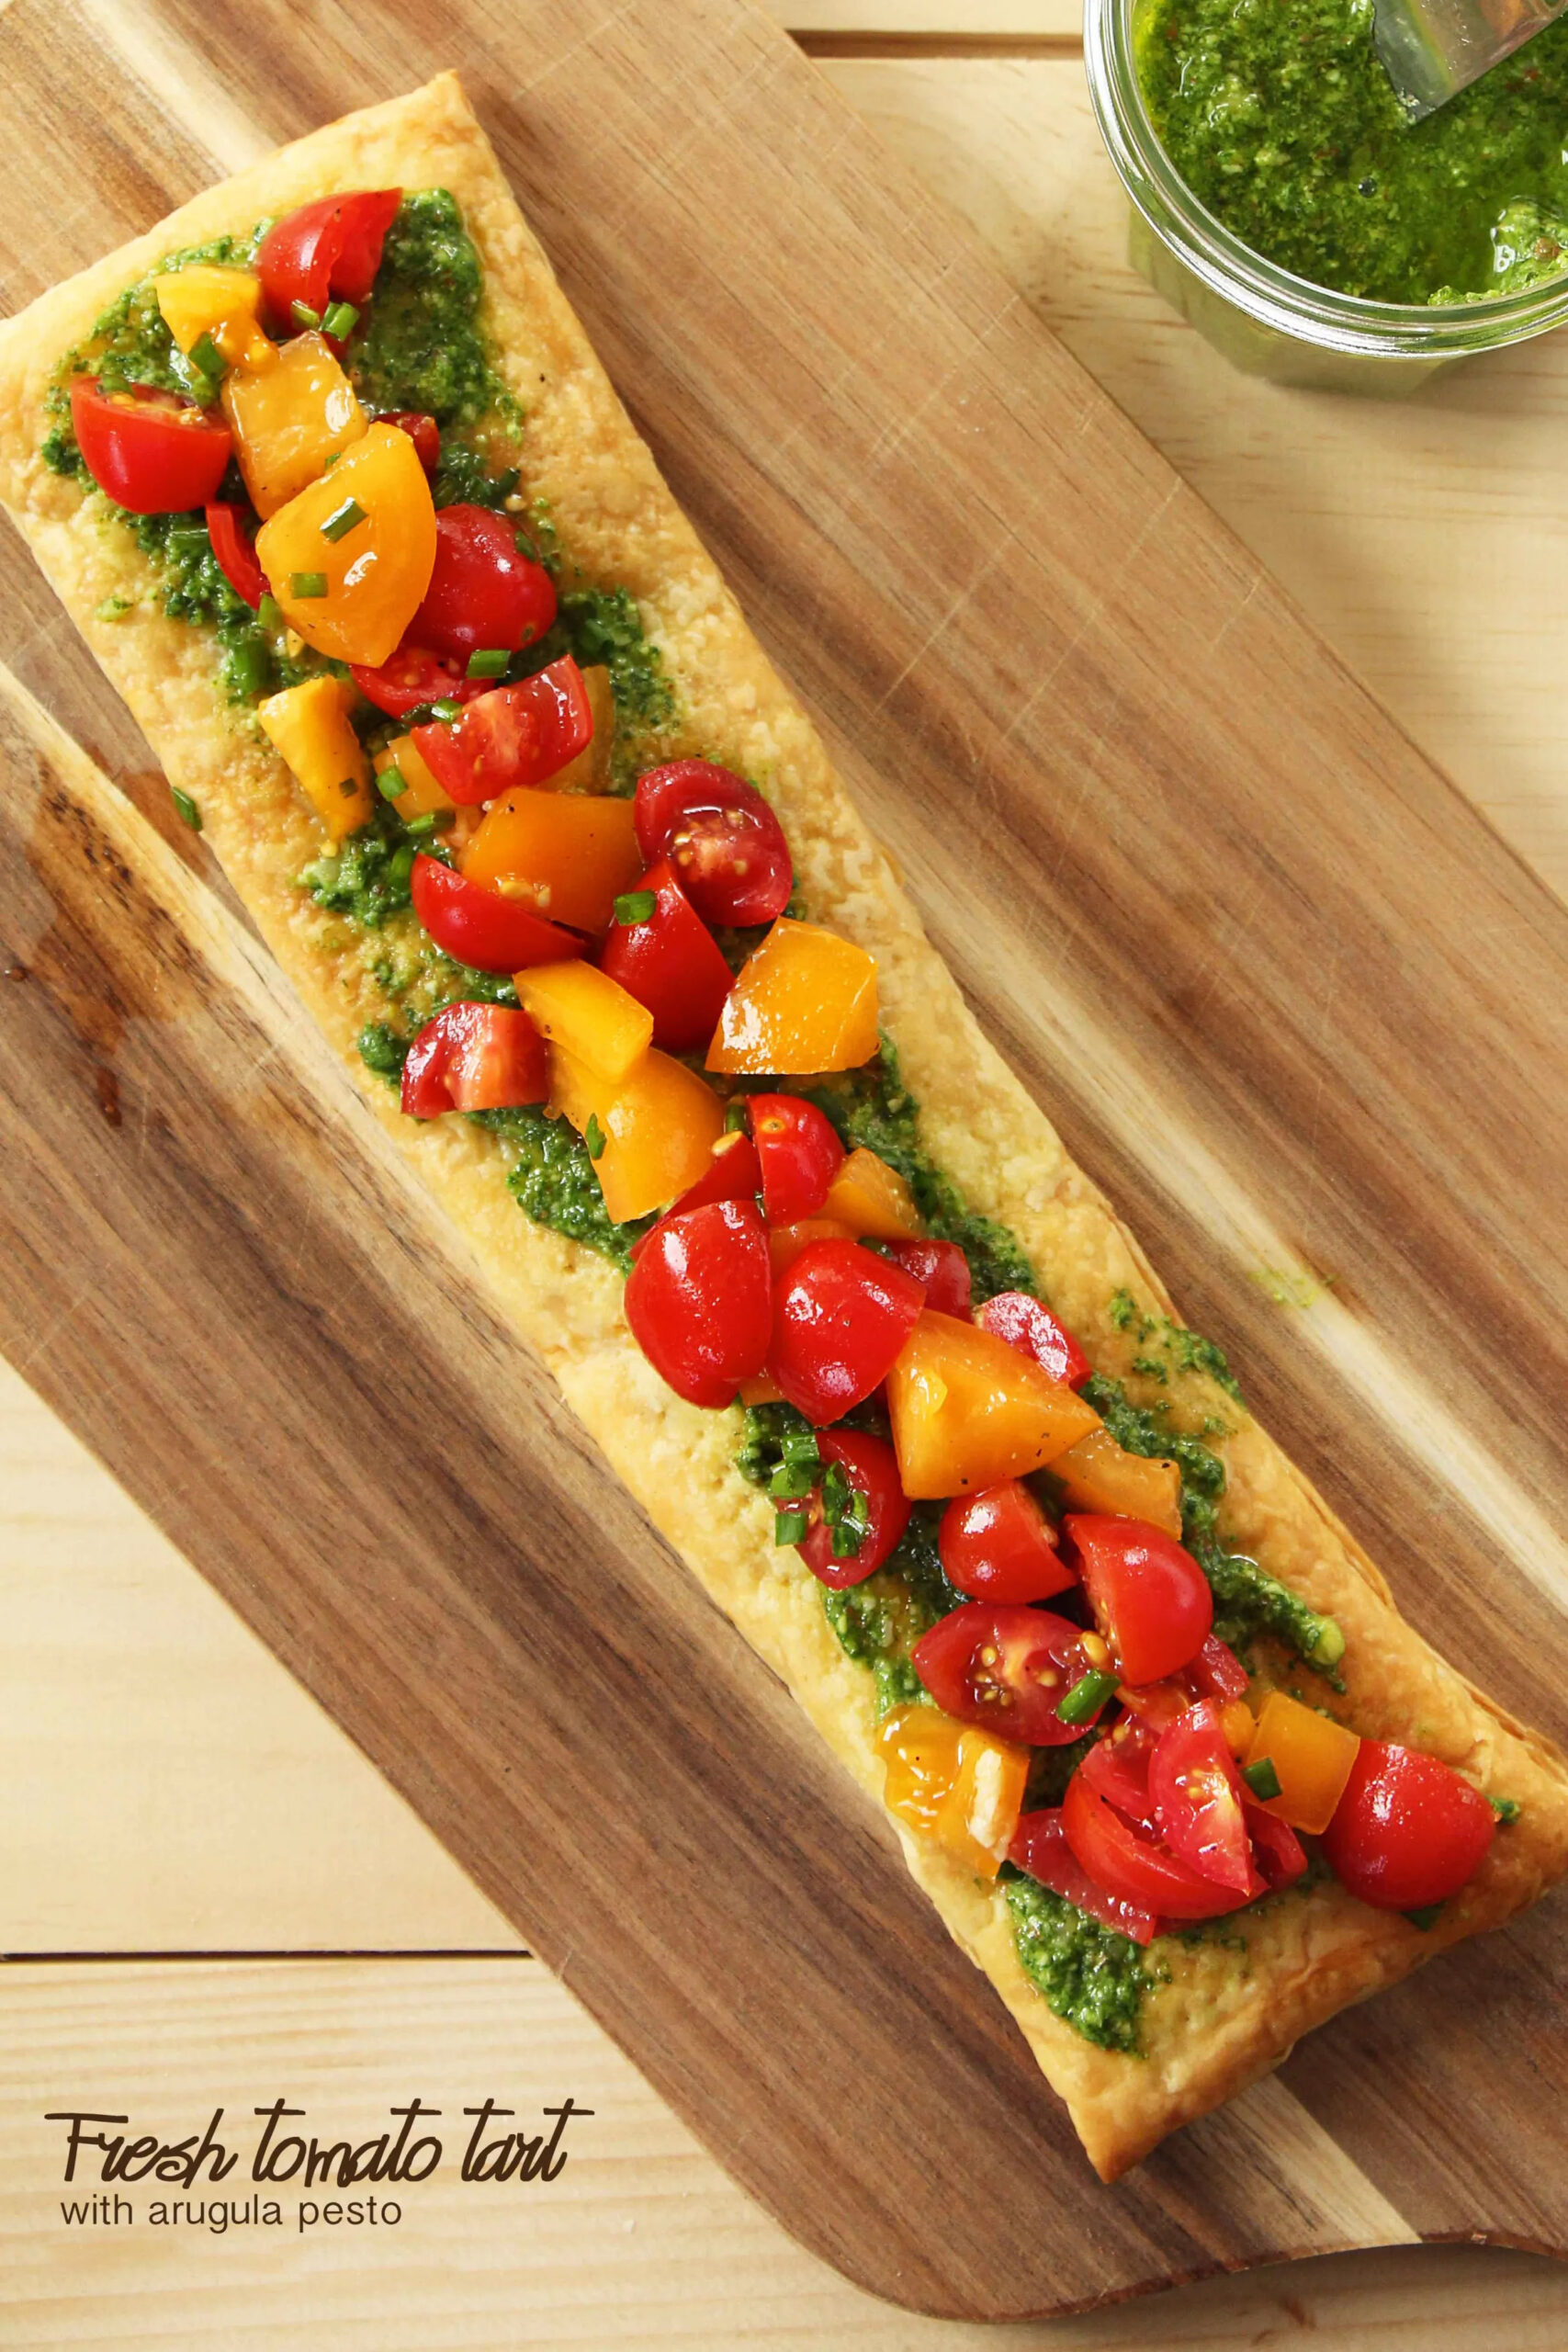
These mini tarts with fresh tomatoes and arugula pesto make a super tasty and light appetizer, whether you’re serving guests or just treating yourself. It’s a win-win, really.

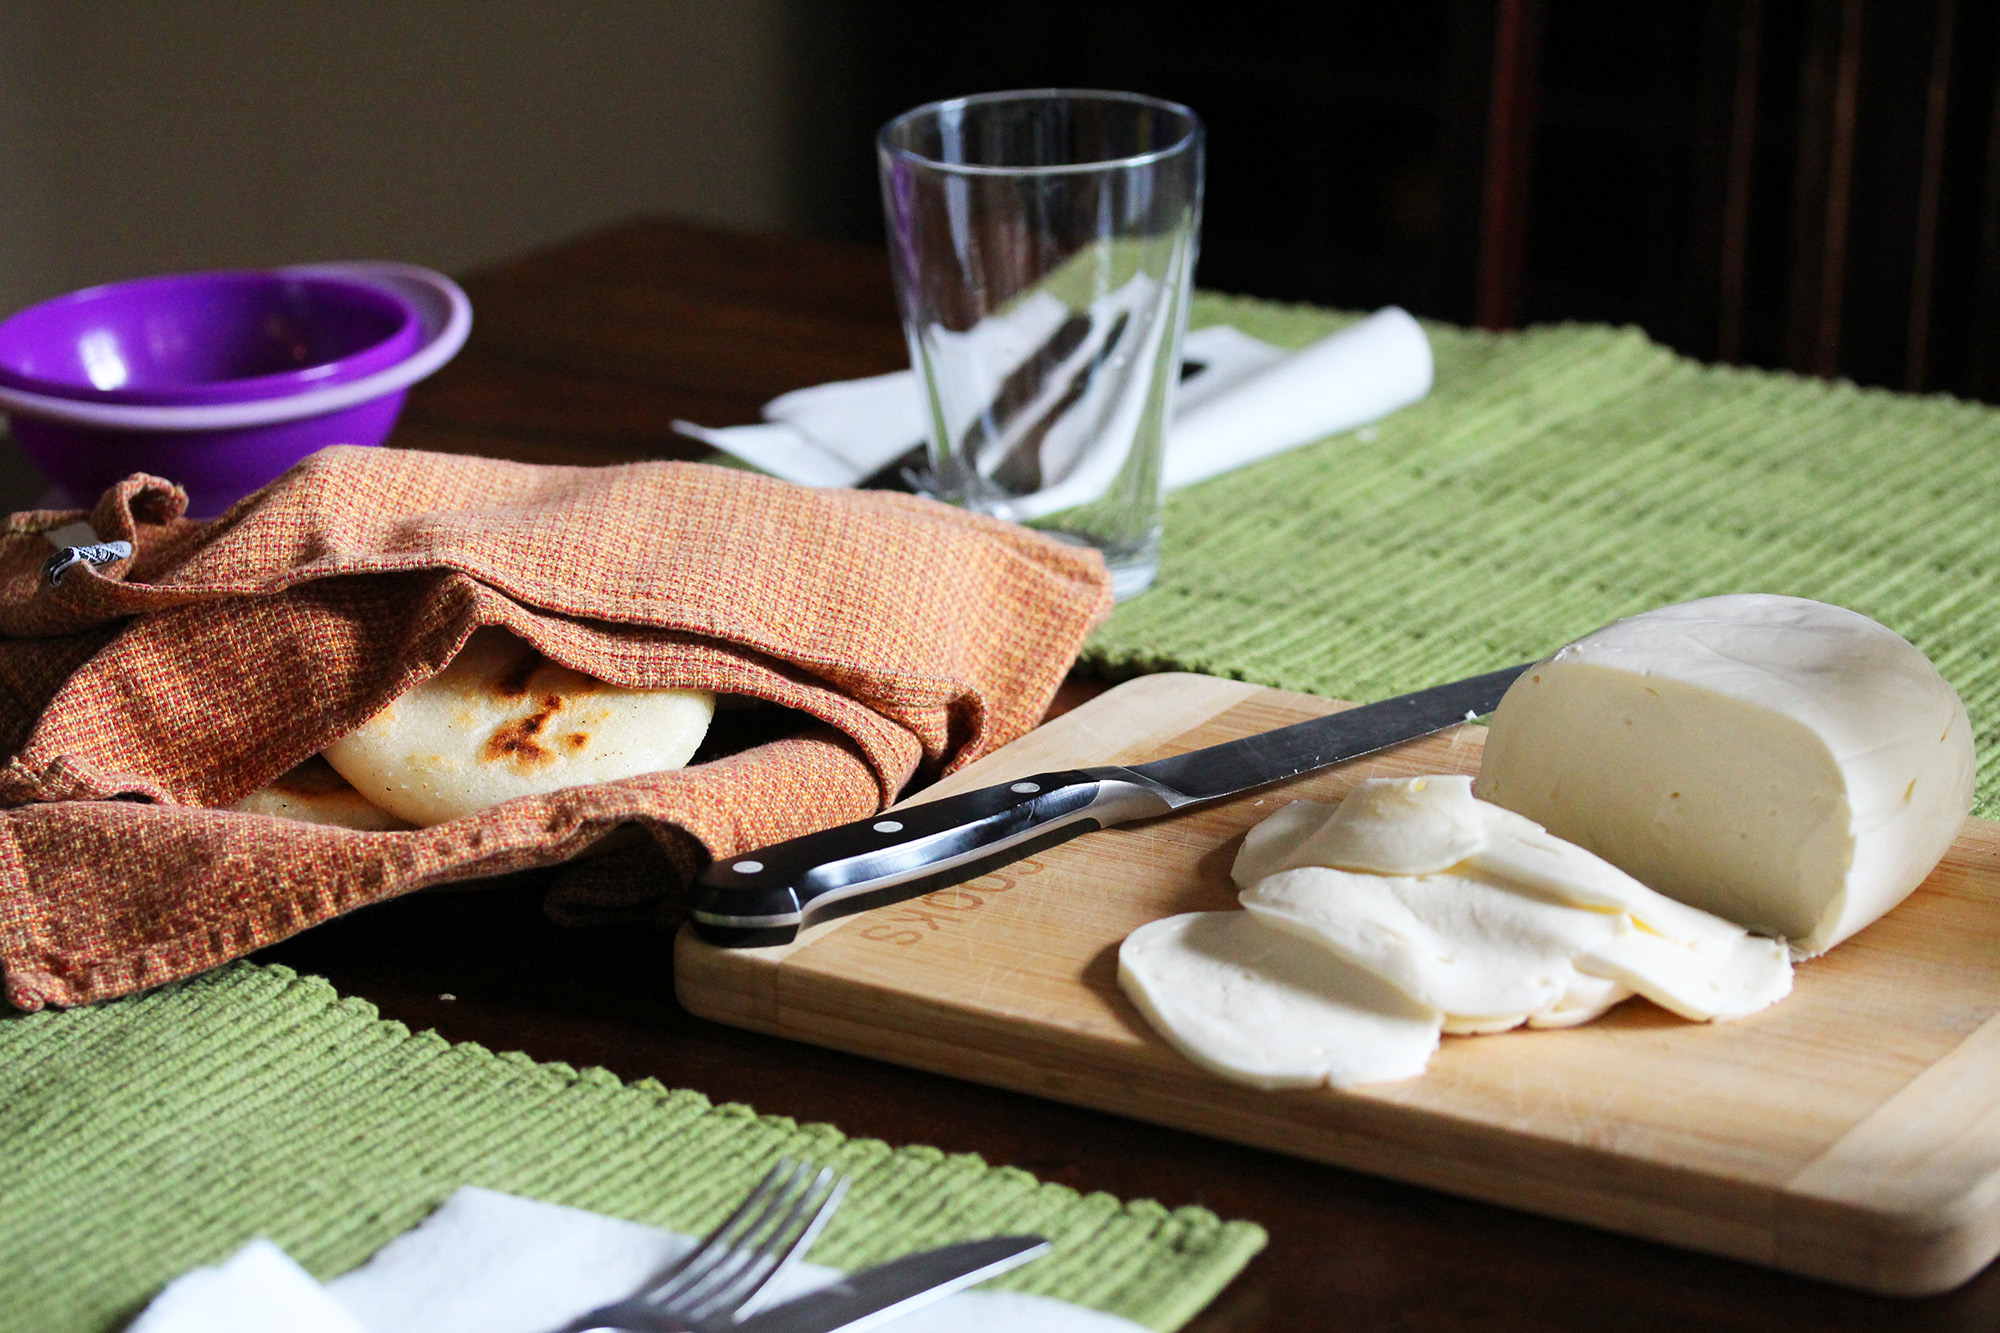
Oh, and here’s a handy tip: Use scissors instead of a knife when chopping chives. It makes the job way easier!

Recipe: Fresh Tomato Tarts

Recipe by Tina – Hungry Bird Eats Course: Appetizers, Baking
Yields

6

tarts

These fresh tomato salad and arugula pesto tarts make a super tasty and light appetizer, whether you’re serving guests or just treating yourself. It’s a win-win, really.

Ingredients

  • Arugula pesto
  • 2 ½ cups 2 ½ packed arugula

  • 1 cup 1 extra-virgin olive oil

  • 1 cup 1 shredded Parmesan

  • cup raw almonds

  • 1 tablespoon 1 lemon zest

  • 1 clove 1 garlic, chopped

  • Kosher salt and freshly ground black pepper, to taste

  • Tomato salad
  • 1 package 1 cherry tomatoes, or 2-3 big ones cut into smaller bites

  • tablespoons olive oil

  • Salt and pepper to taste

  • Tart
  • 1 package 1 puff pastry

  • 1 1 egg, beaten

  • ¼ cup ¼ milk

  • Garnish
  • Chives, chopped

Directions

  • Arugula pesto
  • Toss all the arugula pesto ingredients in a food chopper and blend until finely chopped.
  • Tomato salad
  • Toss the tomato salad ingredients together in a small bowl
  • Tart
  • Take the puff pastry out of the freezer and transfer to your refrigerator to defrost at least 45 min before you are going to use it, or better yet the day before.
  • Preheat the oven to 375°F (190°C).
  • Unfold the dough on a lightly floured surface and use a dough roller that is also lightly floured to carefully roll out the dough until flattened. If the dough starts cracking, it might still be too cold, so allow it to reach room temperature before rolling it out of the package. Usually the puff pastry comes in a square, but mine came as a circle (I bought this brand because it is made with only natural ingredients).
  • You can cut the dough as you like. I prefer the small squares , which are easier to serve, but rectangular or round tarts are absolutely beautiful. To create a border around the dough, poke with a fork in the middle and along the edge of where you want your border. See the pictured instructions. (The edges actually didn’t work for me this time, but I admit I forgot to brush the pastry edges; if it doesn’t work, it is no big deal – they are still going to be tasty).
  • Mix the egg and milk together and brush the puff pastry edges with the egg mixture. Place the pastry on a baking sheet and bake in the oven until the puff pastry turns golden brown.
  • Remove from the oven and spread pesto on top, followed by the tomato salad. Sprinkle some chives on top for garnish.
  • Enjoy immediately.

Recipe: Crispy sunflower rolls

Recipe: Crispy sunflower rolls

Tina: The traditional Danish weekend breakfast always consists of fresh baked morning rolls from the bakery. The Danes traditionally eat the rolls with butter, cheese, and/or jam. We call them “rundstykker”, meaning round pieces. Since I don’t have rundstykker available where I live, I have to make my own. I don’t mind making them – there is nothing better than the smell of fresh baked bread in the morning. Although this recipe makes sunflower rolls that are different than the Danish rundstykker (which are white flour rolls), I like these better because they are a bit more rustic and have more of a bite to them.

This recipe is ridiculously easy to make and takes no time to throw together. You don’t have to stick your hands in the sticky dough and knead, or even shape the dough into rolls. It’s that simple. The dough is made the day before and left overnight to rise in the fridge until next day. The dough gets bubbly, sticky and gooey, and when baked the rolls will have a beautiful crispy crust and a soft inside. Of course you don’t have to just eat these in the morning – they are also really good for lunch to make sandwiches. The crispy crust will disappear after a day, but toast them or heat them in the oven and the beautiful crust comes right back again. 

Recipe: Crispy sunflower rolls

Recipe by 2 Hungry Birds – Tina Course: BakingCuisine: Denmark
Servings

12

rolls

The dough gets bubbly, sticky and gooey, and when baked the rolls will have a beautiful crispy crust and a soft inside. Of course you don’t have to just eat these in the morning – they are also really good for lunch to make sandwiches. The crispy crust will disappear after a day, but toast them or heat them in the oven and the beautiful crust comes right back again. 

Ingredients

  • 17.6 oz 17.6 (500g) cold water

  • 0.28 oz 0.28 (8g) dry yeast or 20 grams of fresh yeast

  • 5.8 oz 5.8 (165g) white whole wheat flour (or normal whole wheat flour)

  • 8.8 oz 8.8 (250g) all-purpose flour

  • 2.1 oz 2.1 (60g) sunflower seeds

  • 1.5 teaspoons 1.5 (8g) salt

  • Decoration
  • Sunflower seeds or pumpkin seeds

Directions

  • Make the dough in the evening the day before you want to bake the rolls.
    With a wooden spoon, mix water and yeast together in a bowl until the yeast has dissolved. Add the flours, sunflower seeds and salt and stir together. The dough should be sticky and not too firm or fluid.  Cover the bowl with plastic wrap and let the bowl and dough sit in the refrigerator over night.
  • In the morning preheat the oven on convection bake at 450°F. Line two baking sheets with parchment paper and use two spoons to scoop the dough up into balls of about 1/2- 3/4 cup in size. Each baking sheet should hold about 6 rolls. Brush with water and sprinkle with seeds on top of each for decoration.
  •  Insert one baking pan at a time in the oven on the middle rack and bake for about 8 min. Then turn down the heat to 400°F bake for another 7 min or until the rolls turns golden and crisp.
  • Take them out of the oven and let the rolls cool for about 5 min on a rack before serving.
  • Repeat step 3 with the other baking sheets of rolls. Now you’ve got fresh baked bread straight from the oven and a really nice smell in the house!

Recipe: Coconut and Marzipan Macaroons

Recipe: Coconut and Marzipan Macaroons

I recently had one of those days where I craved for something sweet and was in the mood to bake. I remembered that I loved eating coconut macaroons (‘kokos toppe’ in Danish) when I was growing up in Denmark – they were one of my favorite baked sweets. It struck me that I hadn’t eaten these for years. I had a giant roll of marzipan (almond paste) in my cabinet, and mixing in some marzipan with coconut sounding intriguingly good.

I baked four dozen, which were quickly long gone, and I am already thinking about making my next batch. For my gluten-free friends, you will love this recipe.

Recipe: Coconut and Marzipan Macaroons

Recipe by 2 Hungry Birds – Tina Course: BakingCuisine: Denmark, Nordic

48

macaroons

I recently had one of those days where I craved for something sweet and was in the mood to bake. I remembered that I loved eating coconut macaroons (‘kokos toppe’ in Danish) when I was growing up in Denmark – they were one of my favorite baked sweets.

Ingredients

  • 3 3 medium eggs

  • 8 oz 8 (225g) sugar

  • 10½ oz 10½ (300g) unsweetened shredded coconut

  • oz (100 grams) shredded marzipan (almond paste)

  • 5 oz 5 (150 grams) dark chocolate

Directions

  • Beat eggs and sugar in a bowl with an electric mixer until the eggs and sugar turn white, about 2-3 minutes. Add shredded coconut and marzipan together until the dough is evenly mixed.
  • Shape the dough into a ball and let it rest in the refrigerator for one hour. This will help the dough stick together easily.
  • Preheat the oven to 350 °F (175°C).
  •  In the meantime use your fingers to shape the dough for each macaroon into small cones (I like them bite-sized, but you can shape them any size you prefer). Make sure to press the coconut as tightly together as possible, as any coconut that is sticking out will burn easily.
  • Bake the coconut macaroons about 15-20 minutes or until they are lightly golden and crisp.
  • Take them out of the oven and let them cool off.
  • Melt the chocolate and dip/brush the bottom of the coconut kisses with chocolate. Let them rest while the chocolate hardens (you can also put the tray in the refrigerator for 5 minutes to speed up the chocolate hardening process). Devour these with some coffee or tea:)

Recipe: Homemade Arepas

Recipe: Homemade Arepas

I have heard a lot about arepas from my Venezuelan friend Indira – she has promised for years to make them for me. She finally made them recently and they have fascinated me ever since.

Arepas originated in Venezuela, and are used prominently in modern day cuisine of Venezuela, Colombia, and in other Latin American countries. They look somewhat like pita bread, but are typically made of precooked corn flour and fried on a skillet instead of baked in the oven. They are served very hot and you can fill them with a little butter and grated cheese, which is the simple and traditional way of serving them. Arepas are also great if you  are on a gluten free/heart healthy diet. If you are on a low sodium diet then don’t add the salt to the dough and of course adjust your stuffing to your diet.

Arepas should be easy to make, as they consist only of 4 simple ingredients. However, the truth is that to make truly great arepas, you need to know a few tricks that you probably won’t pick up from a YouTube video. I was able to finally learn how to make them when Indira’s mother recently visited from Venezuela and I invited myself over. 

Arepas are actually incredibly easy to make, once you understand how to deal with the dough. Please note that the corn flour dough does not respond in the same way as regular white flour dough. The best corn flours to make arepas are labeled P.A.N., and are available in most supermarkets in New York and elsewhere. It is important that the dough is not too dry or it will crack around the edges when you shape the arepas. It is also important to know that corn meal absorbs water slower than regular wheat flour.

Arepas are pretty filling depending on your stuffing, so 2 arepas per person should be enough.

Recipe: Homemade Arepas

Recipe by Indira – Tina’s friend Course: BakingCuisine: Venezuela
Servings

4

arepas

Arepas are actually incredibly easy to make, once you understand how to deal with the dough. Please note that the corn flour dough does not respond in the same way as regular white flour dough. The best corn flours to make arepas are labeled P.A.N., and are available in most supermarkets in New York and elsewhere. It is important that the dough is not too dry or it will crack around the edges when you shape the arepas. It is also important to know that corn meal absorbs water slower than regular wheat flour.

Ingredients

  • 250g 250g  (just over 1 cup) of warm water

  • 1 teaspoon 1 salt

  • 1 teaspoon 1  sunflower oil for the dough

  • 1 teaspoon 1 sunflower oil for the skillet

  • Approximately 135 grams (0.3 lbs/ a little under a cup) Harina P.A.N. pre-cooked corn flour (save a little of the flour after for later)

Directions

  • Fill a bowl with hot water, salt and oil.
  • Add the corn flour to the water little by little. Make sure to save a little of the flour for later. Gather and mix the dough with your fingers. The dough should be soft and on the moist side.
  • Let the dough rest for about 10 minutes to give it time to absorb the water. If the dough is too wet and difficult to shape, add a little more flour to the dough.
  • Heat the skillet on a medium-high heat. Meanwhile, divide the dough into 4 portions and shape one portion of the dough at a time. Roll the dough in your palms so it almost shapes into a ball. Press the dough slightly flat between your two palms and then use both your palms to rotate, and shape the dough into a pita bread shape. Pat the sides while shaping a bit and continue until the dough is about ½ inch thick.
  • Add a little oil to your skillet and spread it evenly across the skillet using a piece of paper towel. Place the shaped dough portions on the hot skillet and allow them to cook until they become golden, about 10 minutes – then flip your arepas and cook the other side. Once both sides are cooked, they are ready to serve.
  • Arepas should be served hot (you can fold them into a clean dishcloth to keep the heat) and can be sliced like pita bread or burger buns. Fill your arepas with a little butter and grated cheese or the ingredients of your choosing. The possibilities are endless. I personally like a little avocado/guacamole and chicken in my arepas or for a breakfast version serve them with scramble eggs.

Recipe: Danish Rugbrød (rye bread)

Recipe: Danish Rugbrød (rye bread)

When I first moved to New York, I realized how much I missed Danish bread. It was kind of frightening to me that store bought bread would not get moldy for more than a month, whereas bread in Denmark would typically only last 4 to 5 days. This is the trade off in convenience with processed foods, but it is also the reason why I started baking my own breads.

Danish rugbrød (rye bread) is a dark rectangular loaf of bread, and is denser than the normal rye bread you will find in most stores. Filled with grains and dietary fiber, it is low in fat and contains no oil or refined sugar, which makes this bread very healthy and filling. Because of the density of the bread, the Danes don’t eat the rugbrød in a traditional American sandwich format, but rather as an open-faced sandwich.

You might have seen me post some of the recipes that go very well with rugbrød. We also call it smørrebrød.

The recipe is based on sourdough, which has a distinguished flavor and also helps to keep the rugbrød naturally fresh for a longer period. Although it is easy to make, be aware that the sourdough takes 4 days before it can be used for baking.

My friend Anne H. passed me the best recipe that I have ever tried, so you have her to thank for sharing. The following recipe is reduced to one loaf instead of two, since I prefer to eat my bread as fresh as possible, and I altered it slightly by adding pepitas (pumpkin seeds).

The bread needs to be completely cool before you can slice it.

*To keep your bread fresh wrap the bread tightly in a clean dish towel and leave it in a dry place at room temperature. The kitchen counter is perfect. Wrapping the bread can keep your bread fresh for a week.

Recipe: Danish Rugbrød (rye bread)

Recipe by 2 Hungry Birds – Tina Course: BakingCuisine: Denmark
Servings

1

loaf

The recipe is based on sourdough, which has a distinguished flavor and also helps to keep the rugbrød naturally fresh for a longer period. Although it is easy to make, be aware that the sourdough takes 4 days before it can be used for baking.

Ingredients

  • Day 1
  • 105 g 105 rye flour

  • dL water

  • 8 g 8 dry yeast

  • Day 2
  • Day 4
  • dL water or (93 grams malt beer and 233 grams water-this will give the rye bread a nice brown color)

  • 150 g 150 all-purpose flour

  • 137 g 137 rye flour

  • 10 g 10 salt

  • 35 g 35 flax seeds

  • 45 g 45 sunflower seeds

  • 45 g 45 pumpkin seeds (pepitas) + a little extra for the bottom of the loaf

  • 125 g 125 cracked rye

  • 1 tablespoon 1 honey

  • Sourdough

Directions

  • To prepare the sourdough, mix the Day 1 ingredients in a bowl and cover with a plate. Let the mixture sit at room temperature on your kitchen counter.
  • On day 2, add the Day 2 ingredients and stir. Let the mixture sit for two more days, stirring each day.
  • On day 4, mix all the Day 4 ingredients (including the sour dough) in a large bowl.
  • Grease a bread pan with oil and toss some pepitas in the bottom of the pan (this optional step allows the bread to come out with a beautiful bottom covered with pepitas). Pour the dough in the pan and cover with plastic wrap. Let the dough rise on your kitchen counter for about 6 hours or until the dough reaches the edge of the pan.
  • Brush the rye bread with a mix of oil and water and bake for 1 hour and 5 min at 200°C / 390°F in the middle rack of your oven.
  • Brush the rye bread with a mix of oil and water and bake for 1 hour and 5 min at 200°C / 390°F in the middle rack of your oven.

Recipe: Apple and Blackberry Pie

Recipe: Apple and Blackberry Pie

My good friend Estelle is an awesome baker. She is an expert in crust, and whether it is for a pie or for a quiche, she knows how to work the dough better than me. She once made this beautiful apple pie with blackberries, and it was the best that I have ever had. I got my hands on the recipe and I am now sharing it with you. I have to admit that I didn’t have enough apples at home, so this pie is more flat than what the recipe would be if adding the full amount of apples. It is however still good, we enjoyed it for Thanksgiving. If you want to skip the blackberries, add ½ pound of apples.

Recipe: Apple and Blackberry Pie

Recipe by 2 Hungry Birds – Tina Course: pies, baking, dessert
Servings

1

pie

My good friend Estelle is an awesome baker. She is an expert in crust, and whether it is for a pie or for a quiche, she knows how to work the dough better than me. She once made this beautiful apple pie with blackberries, and it was the best that I have ever had. 

Ingredients

  • Butter pie dough (double crust)
  • 2 cups 2 unbleached all-purpose flour

  • ¼ cup ¼ granulated sugar

  • ½ teaspoon ½ salt

  • ½ lb ½ (2 sticks) cold unsalted butter, cut into
    ¼ -inch cubes

  • ¼ cup ¼ cold water, or as needed

  • Apple Blackberry Pie
  • 1 portion 1 butter pie dough – double crust (see above)

  • 2 lbs 2 apples (~5 large apples)

  • ½ lb ½ blackberries

  • ¾ cup ¾ sugar

  • 2-3 tablespoons 2-3 all purpose flour (or 2 tbsp quick cooking tapioca).  Estelle uses the Kraft brand tapioca.

  • 1 tablespoon 1 lemon juice

  • ½ teaspoon ½ ground cinnamon

  • ¼ teaspoon ¼ salt

Directions

  • Preheat oven to 400F.
  • Peel, core and slice apples  ½” thick.
  • In a large bowl toss all ingredients. Let stand for 10 minutes.
  • Line pie pan with crust, fill with fruit and dot top with butter.
  • Cover with top crust, fold under around the edges and cut vents.
  • Brush top with milk or cream and sprinkle with sugar and cinnamon.
  • Bake for 30 minutes. Reduce the heat to 350F and cook for another 30-45 minutes until the apple is tender when poked with a knife through vent.
  • Cool completely and serve. To serve warm re-heat in a 350F oven for 15 minutes. Can be kept for 2-3 days at room temperature.